Could You Repeat That?
The extremely small, complex devices used in procedures to restore hearing loss require high-precision, tight-tolerance production. This company has found the right combination of machine tool technology and quality assurance to make it work.
#micromachining
As the body ages, a seemingly endless and continuously growing list of problems arises. Hearing loss stands out as one of the more obvious and frustrating issues to both the individual and those around him or her. As the baby boomer generation reaches the upper stages of middle age and health care issues become ever more prominent, medical machining is reaching full stride. The need for dental implants, bone screws, prostheses and countless surgical instruments of amazingly high quality and precision have helped a relatively new industry thrive. But when it comes to requirements of such minute proportions as those in the inner ear—where a half-millimeter motion of the surgeon’s hand can mean the difference between the patient hearing and not hearing—extreme precision becomes paramount.
Hear’s The Problem
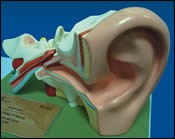
When the ear is working properly, sound waves are received by the outer ear and directed through the ear canal to the tympanic membrane (eardrum). As this membrane moves, the sound energy is transferred to the ossicular chain, a series of bones in the middle ear. The sound then continues to the inner ear fluids, which stimulate the sensory organs, which stimulate the auditory nerve, which sends the sound energy to the brain. It sounds complex, but resolving problems to this process is what is truly incredible.
Featured Content
A number of conditions can lead to problems with the ossicular chain causing hearing loss. Often these problems can be remedied through the use of man-made prostheses to reconstruct the ossicular chain. One of the more common reconstruction procedures, a stapedectomy, is performed to replace or repair the stapes (a stirrup-shaped bone in the middle ear), and it serves to restore the connection between the other bones and inner ear fluids. A stapedectomy can be performed in patients who have a congenital abnormality of the stapes or have sustained a fracture from a traumatic incident. It is most often performed, however, to treat otosclerosis, a common cause of progressive hearing loss involving an abnormal growth of bone in the ear.
In this complex, tedious operation, the doctor typically works through the ear with an instrument about six inches in length, approximately 3/16 of an inch in diameter, tapered down to a point about a half millimeter in diameter. Working with forceps under a microscope, the doctor must maintain yoga-like concentration levels to restore the patient’s hearing.
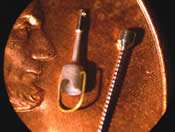
While the first stapedectomy was performed in 1956, improvements in surgical techniques and the prostheses themselves have allowed this procedure to remain an important treatment of hearing loss. In Memphis, Tennessee, Grace Medical, Inc., works to continue advancements in this procedure, with the production of their ALTO titanium ossicular prosthesis, a titanium device measuring as little as 2.5 mm in length and 0.24 mm in diameter.
Where It’s Made
Grace Medical manufactures medical devices that are used in ophthalmology (diagnosis and treatment of disorders of the eye) and otolaryngology (treating the ear, nose and throat). The devices are made from a broad range of materials, from soft silicone compounds to strong titanium alloys. Founded in 1996, the company employs approximately 25 people in a 20,000-square-foot facility that is certified to ISO 13485, a quality management standard for medical devices.
Because the ALTO ossicular prosthesis is designed to interface, or connect, to the tiny ossicles in the middle ear, the shape, surface finish and texture are extremely important. These characteristics affect how the prosthesis interfaces with the tissue as well as the bone itself. During surgery, the physician can easily tell the difference in a prosthesis in quarter-millimeter (ten thousandths of an inch) increments. Consequently, Grace Medical must routinely deal with tolerances to ± 0.002 inch and occasionally to ± 0.0002 inch or 0.0003 inch during the assembly of a prosthesis.
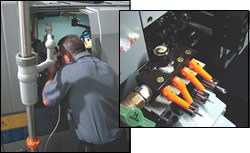
For these particular parts, the company uses its Star ECAS 20 Swiss automatic, with three-axis capability on the back, two-axis capability on the front and a full C axis with live tooling. According to Tony Prescott, vice president of manufacturing, “We often turn to the Star for some of our more complex pieces.” He explains further that the company’s Cincom R07 Swiss-type turning center seems better suited for particularly small parts (yes, smaller than the bucket handle stapedial). “The Citizen, being a smaller machine, allows the operator to get above the work easily and get around the work area,” Tony says. For both machines, as well as an assortment of other lathes and machining centers around the shop, microscopes are routinely used to check setups for workpieces that can barely be seen by the naked eye.
Machining such intricate parts with high precision requires quite a bit of experience and patience. Machinist Andy Prescott proudly explains, “These parts are just everyday Swiss-turn for us.” Because of the type of work the company runs, quality assurance has become a top priority, and finding highly accurate ways to check the work has made all the difference in customer satisfaction.
Reviewing The Work
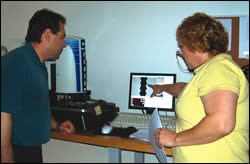
Accurate dimensional measurement during production of these medical devices helps to ensure they function properly and are safe and effective. One way Grace Medical achieves the necessary accuracy is by use of a SmartScope Flash 200 benchtop 3D multisensor measurement system from Optical Gaging Products (OGP—Rochester, New York). Since implementing the system, the company has slashed inspection times more than tenfold—from 10 minutes per part to 40 seconds. “And we’re measuring more dimensions than we were before,” Tony claims.
The company relies on the accuracy of the measurement system to routinely measure critical dimensions to the required ± 0.0002-inch tolerance during typical inspection cycles. Fully automated measuring capabilities allow lights-out qualification of complex components when required. With real-time graphic display of the measurements, operators can immediately identify potential trouble spots and respond accordingly. Also, automatic inspection reports document the process for critical device history records.
Prior to incorporating the SmartScope Flash system into its quality system, Grace Medical performed measurements using an optical comparator, hard gages and other dial indicators. “They required interpretation by skilled operators, which made them slow to use,” Tony says. He and a QA/regulatory team initiated the search for new measurement/inspection equipment to improve compliance with FDA regulations regarding quality measurement and documentation and to increase throughput of the inspection process.
Today, the company’s compact measuring system, with an 8 by 8 by 6-inch measuring range, is capable of checking 10 parts per run in an automated inspection routine. During inspection, the system measures critical dimensions on parts arranged in a holding fixture. The depths of blind holes (0.010 inch in diameter by 0.030 inch deep) are measured to the nearest 0.0002 inch. The system automatically generates inspection reports that are used in device history records. Since implementation of the SmartScope Flash, parts are measured automatically, with higher accuracy and with real-time graphic displays. “The OGP system allows operators to instantly identify visual anomalies and quickly respond,” says Grace Medical Quality Engineer Diane Holton.
Lights-Out Qualification
Because measurements are automatic, Grace Medical also uses the measuring system to perform lights-out qualification of components. The system works without human interaction, so work at the Swiss machines remains focused on expanding and enhancing the unique manufacturing capabilities. Parts with intricate surfaces are then produced faster, using methods that are more accurate and reproducible than traditional processes.
Grace Medical utilizes advanced fourth-axis capabilities of the inspection system to measure parts manufactured on the Swiss machines. The system is equipped with an optional MicroTheta rotary indexer for fourth-axis measuring and MeasureMind 3D MultiSensor metrology software with comprehensive rotary axis calibration routines. These enhancements enable the system to automatically rotate parts within a measurement routine to easily measure anything from simple geometric forms to complex, free-form shapes without user interaction.
Looking Ahead
Grace Medical constantly assesses and validates its machine routines. Because of process improvements implemented as a result of the SmartScope Flash system, 100-percent dimensional inspection is no longer required. In addition, Grace Medical continues to find new ways to use the system’s measurements to reduce costs and improve efficiency.
“In a production environment, the OGP system needs to be viewed and evaluated as a very sophisticated automated production device and not simply as a new piece of inspection equipment,” Tony says. “Cycle times, fixturing for multiple parts to optimize ‘up time’ and quick change-over of inspection routines and tooling need to be considered. Use of the SmartScope Flash 200 system resulted in changes in the production flow that needed analysis, explanation and training to ensure that maximum benefit is gained.”
The inspection system is currently used in a number of company operations, including product development, engineering, production, process control, QA, final inspection and quality training. Grace Medical’s titanium implants have complex shaft geometries on surfaces as small as 0.008 inch in diameter, with core pins as small as 0.002 inch that require accurate measurement. By providing immediate, accurate measurements of dimensions such as these, the SmartScope Flash 200 system helps to speed production of devices critical to patient health—while simultaneously improving quality control.
As an aging generation faces increasing medical challenges, companies like Grace Medical continue to step up. With the technological capabilities available today, companies in the medical machining arena have been able to deliver new, better solutions to the problems we all might anticipate facing. It is best for all if the industry continues to age more gracefully than the typical human body.
RELATED CONTENT
-
Rotary Broaching 101
There continues to be new ways of driving fasteners into the materials they are intended to hold together.
-
Laser Technology "Turns" into a Turning Tool
This new technology uses a laser to act as a cutting tool to "turn" parts from solid barstock. This high-speed precision turning machine is especially useful for micromachining, enabling high accuracy for small, complex parts that are often delicate and difficult to machine when implementing conventional turning processes.
-
Video Tech Brief: Dual Thread Whirling on a Swiss-Type CNC Lathe
The dual thread whirling units on Tsugami Swiss-type lathes can produce medical bone screws with two different thread leads in one setup, eliminating the need for single-point threading.


