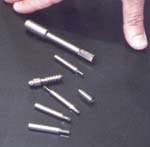
Forming Hex Holes For Bone Screws
Close tolerances and quality surface finish are critical in successful medical machining. To meet such requirements in broaching titanium and stainless steel bone screws, with machined depths ranging anywhere between 0.080 and 0.150 inches, Hassay Savage Company (Turners Falls, Massachusetts) has recently developed an indexing-broach process using four-point or two-point punch broaches for use in Swiss-type CNC lathes.
Close tolerances and quality surface finish are critical in successful medical machining. To meet such requirements in broaching titanium and stainless steel bone screws, with machined depths ranging anywhere between 0.080 and 0.150 inches, Hassay Savage Company (Turners Falls, Massachusetts) has recently developed an indexing-broach process using four-point or two-point punch broaches for use in Swiss-type CNC lathes. Clearance at the bottom of the cut is as little as 0.01 to 0.020 inch, which is critical to minimize any area where bacteria could develop on the part.
Unlike with rotary broaching, 0.0005-inch tolerance on the hex form is easily maintained on parts produced with the indexing-broach process. Longer tool life is also achieved because cutting pressure is distributed to the two or four points, where in rotary broaching, only one cutting edge is doing all the work at any given time in the cut. Tool life averages between 300 and 750 parts. Powdered metal and cobalt-based technology helps to optimize these double-ended broaches for the specific material being machined.
Featured Content
In the indexing-broach process, the broaches are mounted into a standard collet on a gang tool setup, avoiding the costly setup time associated with rotary broach holders. The broach does not need to be timed to the part because the final hex form is generated by the part holding fixture.
To prepare for the broaching operation, the pre-drilled hole must be at least 1 percent to 2 percent larger than the size of the hex (across flats). A 90-degree chamfer is necessary to prevent the points of the broach from chipping upon engaging the pilot and to allow for the lead of the formed hex to be developed on centerline.
As the broach enters the pilot hole at a feed rate of 3 to 6 ipm, an imprint of a partial hex is formed. A small micro end mill can then be used for cleaning out chips and clearing the way for the next broach pass. The part is then indexed 120 degrees and punched for another imprint. Chips must be cleared again (after every broach pass). Three punches will generate a full form that is capable of 0.0005-inch tolerance.
Because of the high reliability and repeatability of these tools, several factories are making use of a lights-out production environment. Although this process is most commonly used to form hexagons, the concept has been expanded successfully to the production of squares.
Because of the rigid finish requirements for parts in the medical industry, deburring operations have faced scrutiny in quality control circles. A recent design in secondary tooling has allowed manufacturers to substantially minimize costly quality control rejections for having burrs in parts’ holes. Held by an adjacent toolholder with a collet assembly, a dish-faced deburring tool is used. The tool feeds in slightly further than the formed hex depth and clips the burrs of the original pilot drilled hole. When used in conjuction with the hex broaches, these tools provide for an optimal finish.
RELATED CONTENT
-
Making Parts on a Swiss/Laser Machine
Adding laser cutting to Swiss-type machining is helping this shop do more work for its customers in the medical industry.
-
Hard Turning as an Alternative to Grinding
Hard turning can be a cost effective alternative for shops looking to streamline part processing.
-
Understanding CNC Collet Chucks
Workholding for turning is usually fairly basic: The selection comes down to chucks or collets. This article looks at when to consider the collet chuck and what kind might be best for a given application.


