CT Scanning Looks Inside Metal Parts
A new tool being employed by Exact Metrology is taking a page from the medical community to perform nondestructive testing and allowing a look inside castings and other parts.

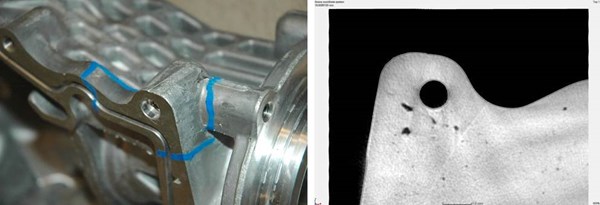
The blue paint on the test casting indicates stress areas where leaking or breaking are suspected. The scans reveal voids and highlight the most serious problems.
Until now, checking cross sections of castings and other metal parts required cutting open the parts with a saw and examining the sections. A new tool being employed by Exact Metrology in its new Cincinnati office is taking a page from the medical community to perform nondestructive testing and allowing a look inside castings and other parts.
The company has a new metrology grade GE CT scanner that can section parts in aluminum with wall thicknesses of six to seven inches and steel thicknesses of one inch. According to the company a recent job represents the first use of CT scanning for metrology in the U.S.
By literally looking inside a casting, 3D views are possible while generating true dimensional data of the scanned area. The workpiece (casting) was rotated 360 degrees in the x-ray beam’s path while multiple readings from various angles were taken.
Once the CT grey scale images were converted to voxel-based 3D point clouds, a CAD- to-part comparison was created for the customer. Seeing is believing and applying CT scanning to metrology allows us to see in entirely new ways. Click here to watch a video of the CT scan in action.


