In-Process Thread Inspection
A supplier that cannot guarantee thread quality can be hit with thousands of dollars in penalties and risks a strained relationship.
Because of the high cost of nonconforming parts, product companies are increasingly requiring their suppliers to provide 100 percent inspection of internally threaded parts. Customers want to verify not only thread presence but also thread quality. Incompletely threaded holes or obstructed threads can cause significant downtime with automated assembly equipment. A supplier that cannot guarantee thread quality can be hit with thousands of dollars in penalties and risks a strained relationship.
Some things are easier said than done, especially in high production. While external threads are accessible to a number of inspection techniques, internal threads are difficult to check rapidly.
Featured Content
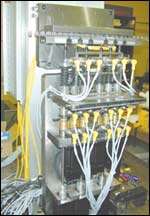
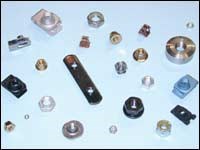
A couple of advances in the field of motion control have made high speed mechanical verification of internal threaded holes a preferred alternative for some manufacturers. The experience of Baltimore, Maryland-based custom machine builder New Vista Corporation has shown the relative virtues of mechanical thread checking. New Vista Corporation recently built a unit for a leading panel nut manufacturer for high speed thread checking of panel nuts. The unit is integrated into an existing stamping/forming machine line and takes the place of eddy current units that proved unreliable. Including index, the six-spindle unit processes six nuts every 0.85 seconds or 25,400 nuts every hour.
Because the index is 0.35 seconds, the six mechanical gages must fully probe and exit the part within a half-second. “Ten years ago, this wouldn’t have been possible to do reliably,” says Jim Brun, vice president of engineering at New Vista.
Two motion control advances have made this very short cycle possible: mid-motion servomoto drive command changes, and the shortening of program logic controller can times (or time to process signals) from milliseconds to microseconds.
Mechanically, each spindle is designed for high production work. A high response servomotor drives a special coated thread gage probe, which is essentially a “go” gage. In between is a compression compensating mechanism, which prevents damage to both the drive and nut strip in the event that the part is not threaded.
Also in the drive is a torque limiter mechanism that permits the gage to stall in incomplete or damaged threads or spin at the entrance of missing threads. Either event causes the spindle to fall short of a limit, signaling a reject. (A “probe presence” sensor ensures that the gage probe is in place.) The drive in this device reverses at full torque to ensure that the gage exits the part, even if it jams in a damaged thread.
Mechanical verification has a few benefits. For one thing, it simulates how the threaded hole is actually going to be used. If the gage probe passes through the part, then the assembly line screw is sure to thread properly. In addition, this type of mechanical system is very robust; if the hole is out of position or has a broken tap in it, the compression compensating mechanism and torque limiter mechanism will protect the unit.
The downside of mechanical testing is the wear on the unit. Mr. Brun recommends that a manufacturer keep a spare spindle and gage probe in stock. A probe should be replaced every 1.5 million cycles, he says.
RELATED CONTENT
-
Setup Options for Swiss Automatic Lathes
A hydraulic chuck and a counter-balanced centering tool, originally developed as in-house solutions, are now available to address the limited working space that is common in Swiss machining.
-
Sorting And Inspection...At What Cost?
Suppliers are feeling the heat to achieve zero defects PPM. Old methods are giving way to automated systems. Here’s a look at how lasers are leading the way.
-
Determine Passivation of Stainless
Properly cleaned stainless steel is naturally protected from corrosion by a thin, passive film. But this passive layer can be removed or scratched. A passivation meter measures the surface potential under controlled conditions.


