Attain Consistent Roundness and Concentricity Readings
The CNC Swiss-type lathe is finding an increasingly large market as non-traditional Swiss shops find its production advantages for small, precise and complex workpieces.
The CNC Swiss-type lathe is finding an increasingly large market as non-traditional Swiss shops find its production advantages for small, precise and complex workpieces. Its ability to produce these parts in a single handling is especially attractive.
As advanced as the technology is for these machines, just about every shop out there is faced with what is often considered a routine, yet an extremely necessary process: measuring roundness and concentricity. Upstream and downstream of the machining process is the need to ensure accuracy, especially when going from job to job operations.
Featured Content
From tooling to barstock, to finished product, runout and concentricity play a large part in everything a shop does. In many cases, meeting a given tolerance or range comes into play for part acceptance. Eliminating errors in a shop’s machining process cannot be minimized. It is part of the daily production routine. Having consistent inspection methods and equipment for gaging runout and concentricity can be critical for customer acceptance.
A Better Way to Gage
So what is the easiest way to verify runout and concentricity of small parts? You could use an accurate v-block and gage stand on a surface plate, but this introduces interference in the readings from hand turning the component to be measured.
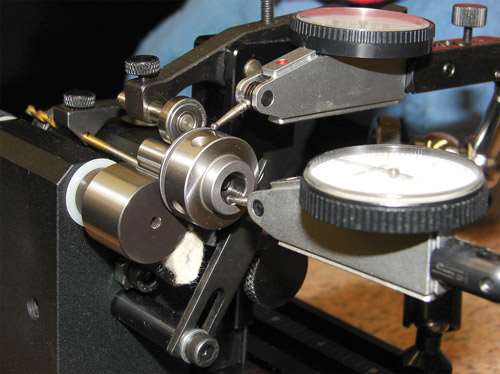
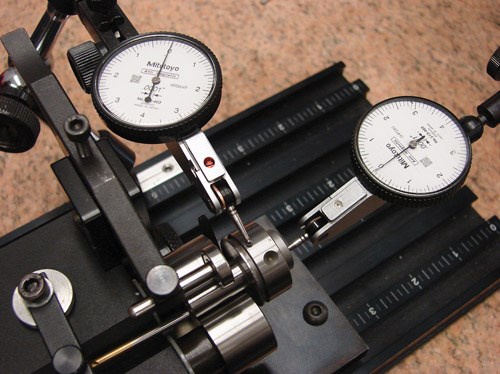
The ideal and most practical way to accurately perform a quality control test on a round object, whether it is a tool bit, toolholder/collet/tool assembly, is using a purpose-built concentricity and runout gaging system. A system such as this prevents errors in readings and literally uses a hands-off approach to rotating the objective component, reducing human error in the process. And, most importantly, it saves time. If you have to gage, doing it as efficiently as possible makes sense.
What makes for a useful and cost-saving, stand-alone system? For starters it should include high precision datum rolls for rotating objective pieces. For Swiss shops using a gaging system with a guaranteed accuracy of about 2 microns (0.00007 inch) or better is ideal.
Shops are better served by actually measuring its parts and not tracking down bad readings from inaccuracies in the gaging system that may not be giving consistent readings. Also, a dedicated system with a timed hand crank and belt-driven pulleys for the datum rollers eliminates skewed indicator readings by isolating the piece from manual input.
In addition to these preferred features, most gaging systems include some mechanism for facilitating repeat measurements. Usually, this is an additional tension roller that applies clamping force to the piece to be measured, holding securely between datum rollers, yet allowing it to freely rotate.
Also, an adjustable stop can facilitate rapid repeatability when gaging a quantity of identical parts and help ensure all pieces are located the same. A system such as this is the perfect way to check live tooling spindle components during rebuilds, checking tooling and holder accuracy, finished product accuracy and virtually anything with a cylindrical outer profile that requires a round OD or ID. Using two indicators simultaneously, one can check concentricity between the two diameters or round features.
Putting a Spin on It
Using such a gaging system is simple. The operator clamps the spindle component, tool bit, toolholder or finished part into the datum rolls on a cylindrical qualified diameter for runout measuring. For Swiss applications, a 0.0001-inch dial indicator should be used.
In some cases, a t-slot base may be included with the gage system to make it portable and facilitate mounting of articulated indicator arms for ease of use outside the quality control department. Rotate the gage crank at a smooth, constant speed to obtain readings. Minimizing part hangout from the datum surfaces increases accuracy.
A New Gaging System
Genevieve Swiss strives to offer innovative problem solving products related to Swiss-type machining and the precision parts manufacturing industry. A new product is available for gaging concentricity and runout for Swiss shops called GenGage runout gage.
The system delivers a cost-effective solution for gaging runout of small components ranging in 0.125 inch to about 1 inch in diameter. Available in modular configurations, the GenGage is a versatile piece of equipment that can be used as a standalone unit or in conjunction with an optical comparator, making the system a valuable addition to any precision parts shop.
RELATED CONTENT
-
Advancements in Thread Whirling Tooling Technology
Many understand the advantages of thread whirling on a CNC Swiss-type. However, new tooling technology for this thread-machining process can further improve cycle times and reduce cost per part.
-
6 Tips for Training on a Swiss-Type Lathe
There are nuances to training a person to effectively operate a Swiss-type lathe. A shop I visited a while back offers some suggestions.
-
Turning to an Adhesive for Lathe Workholding
Adhesive cured by ultraviolet light is an option for securing parts for machining that could otherwise distort when traditional, mechanical clamping techniques are used.


