5 Process Security Tips for Parting Off
Here are five rules of thumb from Scott Lewis, a product and application specialist at Sandvik Coromant, to optimize the parting off process, and as a result, maximize tool and insert life.
#basics
Parting off is one of the last operations completed when machining a component. Process security is important because if a tool breaks this late in the process, it can lead to machine downtime and scrapped components. Although parting off is a small portion of the total machining time, shops sometimes have misconceptions and make frequent mistakes with this task. Here are five rules of thumb from Scott Lewis, a product and application specialist at Sandvik Coromant, to optimize the parting off process, and as a result, maximize tool and insert life.
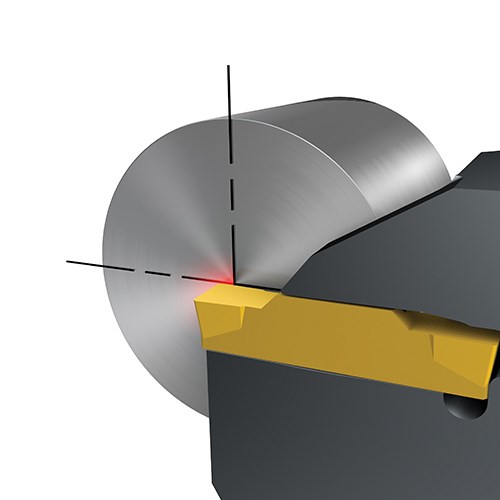
Reduce Feed When Approaching the Zero Point (Figure A)
Feeding a tool toward the center of the component in a parting off operation (in most cases, a solid bar) results in feeding that tool toward the zero point. As the tool gets closer to the center, the diameter of the machined area shrinks toward zero. To compensate, some programs automatically increase the RPMs to maintain the surface footage as the diameter drops. However, if the feed rate is not reduced, there comes a time where there is not sufficient speed to keep cutting conditions optimal.
Featured Content
Moreover, reducing the feed rate runs the risk of developing a built up edge (BUE): a condition where material begins sticking or welding to the insert edge, usually because of a lack of heat from lower cutting speeds. Because a BUE is generally thinner than the insert edge, it can snap off and take a piece of the insert edge with it, which either reduces or ends insert life.
Mr. Lewis recommends substantial feed reduction as operations approach 0.080 inch (2 mm) from the center. He adds, “Even at that 0.080-inch (2-mm) threshold, your speed is probably already reduced. Before it gets too slow and starts affecting the insert, we tell operators to slow down their feed by up to 75 percent. If you were using a very hard, wear-resistant grade, and you don’t slow the feed down before center, this is even more crucial. Those hard grades are less forgiving and are more likely to chip or break.”
Stop Before Center (Figure B)
In addition to the first rule, stopping before the tool hits the centerline of the part is recommended. If the feed is stopped completely before hitting the zero point, the weight of that part will create a wobble and fall off. If there’s a subspindle, an operator can twist off the part and pull it away from the main spindle. A subspindle can be moved away from the main spindle by 0.001 - 0.002 inch before the insert reaches center to reduce the pinching effect of some materials.
Another reason not to go past center is that once the part breaks free, it is more likely to strike and damage the insert.”
“I see many customers that feed a parting insert past center," Mr. Lewis says. "What they don’t realize is that at center, their speed is zero. This creates a rubbing action as the insert travels across the center, and the remaining material is sticking out. Many customers worry about a part not falling off, so they go past the zero point and then drag the insert back as they retract the tool. But if you feed past center, the rotation of the part will try to pull the insert out of the pocket. My advice is if you want to feed the tool past center, do not feed more than center plus the value of the insert corner radius.”
In many cases, operators don’t even have to feed to center, so Mr. Lewis recommends slowing it down to a full stop approaching the center. He adds, “The distance from the center will vary depending on part diameter, speed and part shape. Then the part either falls off from the forces or weight of the part. Another reason not to go past center is that once the part breaks free, it is more likely to strike and damage the insert.”
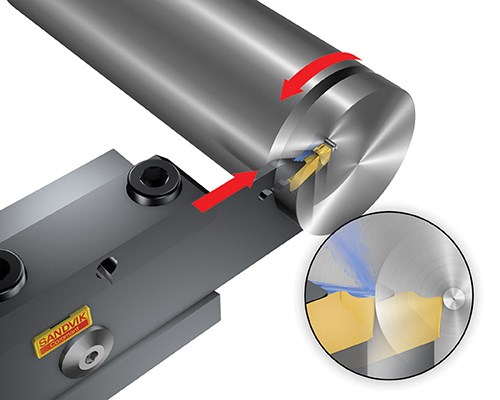
Turn the Coolant Off When RPMs are Maxed Out or Start to Decrease (Figure C)
Many traditional tools rely on external splash coolant. For tools with internal, or through coolant, such as the CoroCut QD, the insert edge tends to stay cooler. As an insert gets closer to center and RPMs are maxed out, the temperature at the cutting point can drop to the point of creating a BUE if the coolant remains. This is important for wear resistant grades (hard grades). While the tougher grades are designed to be more forgiving in reduced temperatures and lower speeds, harder grades are prone to chipping in these conditions.
“This is also crucial when parting off stainless steel, because that material is notorious for wanting to stick to the top of the insert edge, creating a BUE,” Mr. Lewis adds.
Maintain a Reasonable Center Height
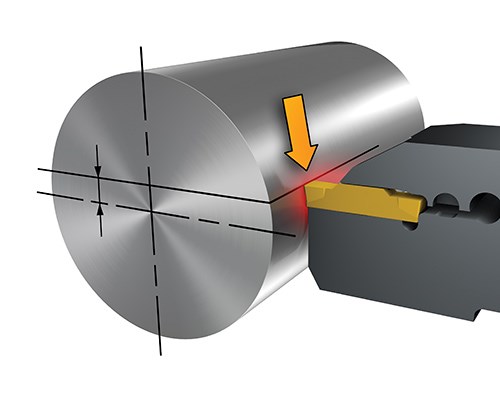
(Figure D)
The center height should be within ± 0.004 inch (0.1 mm). The more over center the tool is, the less clearance there is underneath the insert edge and the higher chance for rubbing and vibration, creating noisy chatter and insert breakage. And if the tool is below center, the cutting forces increase on the cutting edge and can chip the insert. When well below center, an operator can actually sheer off an insert completely because the cutting forces are so much higher, or can fatigue the insert clamping affecting security.
“When you exceed the ± 0.004 inch center rule, you can experience issues that will shorten the insert life,” Mr. Lewis says.
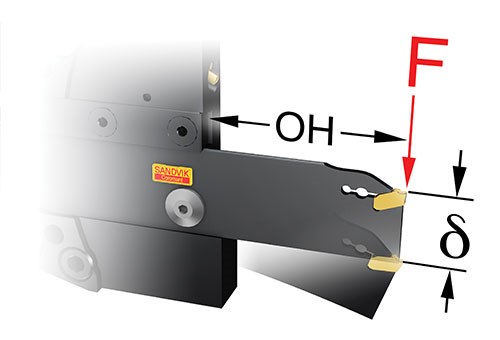
Keep a Short Overhang (Figure E)
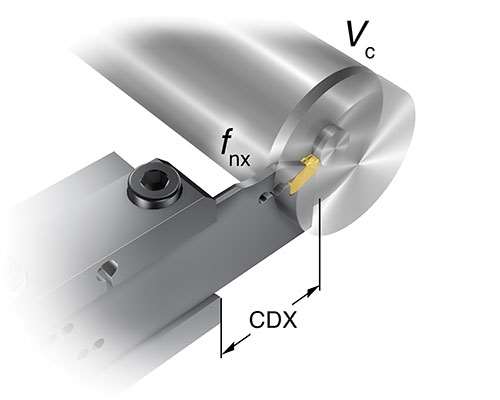
With many turning tools, the shorter the overhang, the more rigid and secure the setup tends to be. This relationship is even more pronounced in parting off operations. If the tool is hung out too far, it’s prone to vibrations and chatter, which can result in insert breakage. This rule isn’t only about tool life, but also addresses a sound quality issue in the shop. In general, the recommended overhang is 8 to 10 times the insert width, but when using part-off blades, it’s common to exceed that width. With the new CoroCut QD tools, that general rule is extended because of the unique insert geometries, coolant-through and new holder material.
Mr. Lewis says, “I would only recommend pushing the boundaries if you have a very clean material without interruptions. If there are interruptions or scale, stick with shorter overhangs.”
The use of bar fed machines require cut-off, and getting the most from that operation is a key to improved production rates and lower scrap. Applying Mr. Lewis’ tips can help the production process.
Sandvik Coromant | 201-794-5000 | sandvik.coromant.com
RELATED CONTENT
-
A Guide to Insert Coating Processes and Materials
Few materials have had a greater impact on our economy and industrialized culture than cemented tungsten carbide.
-
Tools and Technologies for Deep Hole Drilling
Understanding the challenges of deep hole drilling and knowing how to select and apply the appropriate tools will help a shop profit from this operation.
-
Advantages of Cellular Manufacturing
Manufacturing cells are used to minimize product movement as well as materials, equipment and labor during the manufacturing process. By reducing cycle times and material handling, these cells help shops more easily meet customer demands regarding cost, quality and leadtimes.


