Process-Oriented Measuring Technology For Turning Tools
Because tools create the geometric shape of a workpiece, the accuracy of this shape is dependent on the position of the cutting edge to the workpiece. Therefore, the position of the cutting edge should be identified and maintained as precisely as possible. One reliable method for achieving the accuracy needed is through the use of a laser system for tool setting.
Because tools create the geometric shape of a workpiece, the accuracy of this shape is dependent on the position of the cutting edge to the workpiece. Therefore, the position of the cutting edge should be identified and maintained as precisely as possible. One reliable method for achieving the accuracy needed is through the use of a laser system for tool setting. These systems provide high-precision measurement of each cutting edge geometry, even under working conditions, and can be configured to take into consideration most of the basic conditions of the system.
The Blum LaserControl (Blum LMT Inc., Erlanger, Kentucky) is designed to provide accurate, high-precision measurement of turning tools in rough working conditions. The system can be set up for detection of shaft breakage, measurement of tool length and diameter, form control (breakage and wear) and thermal compensation of the machine axes. When measuring tools dynamically, at nominal speed in the working area, it is possible to detect setting errors and to find the effective length and radius compensation values.
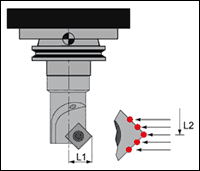
The number of driven tools in turning machines has been steadily increasing to coincide with the more widespread combinations of turn-mill centers. The advantages of laser measuring technology apply equally to driven tools as to milling centers. Blum has developed special measuring cycles to meet the significant requirement of determining the high-level point. The high-level point on the turning tool is the effective dimension of the tool that determines the dimension of the workpiece. This high point must exactly meet with the laser beam to determine the correct dimension. With a touch probe, the effective length is automatically determined, as it represents the contact point with the measuring surface. Laser measurement, however, still requires determination of the contact point. Blum has turned this apparent disadvantage of laser measurement into an advantage with the help of the high point finding routine (HOPER). HOPER not only measures length value (L1), but at the same time determines L2, the position of the high point.
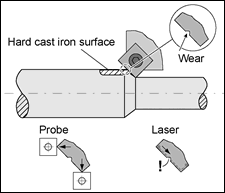
Laser systems bring other distinct advantages to turning tool measurement, including detection of cutting edge breakage, measurement of corner radius, wear detection at any position and scanning of the complete cutting-edge geometry.
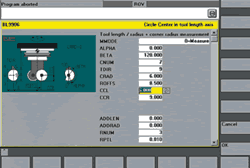
The circle center line (CCL) routine also is available with laser measuring technology, providing capabilities beyond those available with a mechanical probe. A modified version of this cycle has been used successfully for years in mold manufacturing to increase measuring accuracy. The CCL routine was adapted to the requirements of turning machines. The cutting-edge radius and its center point are determined through a circle regression using the CCL routine along several measuring points.
Non-contact laser measuring technology allows scanning of the complete tool shape. When using a touch probe, measurement is always performed paraxially, so tool wear or breakage can only be detected at the contact points. Laser systems allow scanning of complete tool geometries, so wear can be detected at any cutting-edge position.
When laser systems were first used for tool measurement in machining centers, the priority was on the control of the tools. Through the years, because of the increasing requirements of production metrology, the emphasis has shifted to the measurement of the tools. This transition was made possible by the advancement of laser system technology, including the introduction of an effective protection system, the development of the intelligent electronics, and the continuous improvement of the laser diode with its optics.
The optics of the transmitter and receiver are now protected against coolant and chips by a pneumatically operated shutter. During measurement, air purge helps to prevent pollution of the lenses.
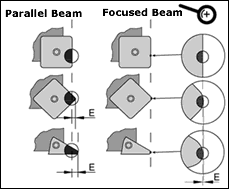
When measuring small tool radii, the quality of the laser system is dependent on the quality and size of the beam. The larger the beam is, the bigger the measuring error (E). The receiver of the laser has an operating point at a defined percent shading of the laser light. Various cutting-edge geometries shade the beam differently, and they generate different measuring results for different geometries.
Regardless of the amount of technology built into a machine tool, without proper programming to account for tool size and wear, satisfactory parts are not likely. The LaserControl measures the tool as it rotates in the spindle, providing immediate breakage detection and automatic correction of drifted axes.
Related Content
Parting Off: The Case for Standardizing on Sawing
The value of rotary saw cutting for parting off operations could boil down to simple economics paired with process efficiency gains.
Read MoreThe Ins and Outs of Inserts
Understanding how inserts are made provides valuable insight into how their performance can be optimized.
Read MoreBroaching Tool Technology For Lathes Used to Slot Inconel Parts
This shop finds value in using an indexable-insert-style broaching tool to create blind-hole slots in heat-treated Inconel aerospace parts on a CNC lathe.
Read MoreTaking a Calculated Approach to Thread Rolling
Thread rolling operations for Swiss-type lathes, multi-spindles and other turning equipment can be enhanced using online calculators to determine optimal process parameters.
Read MoreRead Next
Can You Afford To Ignore Tool Monitoring?
In production, eliminating variability is the key to making good parts consistently. Cutting tool condition is a critical variable in the process. With a return on investment, in many cases, of less than a month, in-process tool monitoring is a cost-effective way to help plan and verify a shop's cutting tool strategy.
Read MoreMonitoring Perishable Tools On Automatics
Monitoring tool wear is an essential component to getting greater productivity and lower costs from a machine tool.
Read MoreFinding the Right Tools for a Turning Shop
Xcelicut is a startup shop that has grown thanks to the right machines, cutting tools, grants and other resources.
Read More


