

Micro Deburring Gets Hot
“Micro deburring,” a name commonly used to describe the deburring of tiny small parts, is often considered more of an art than a science. Although this is true to some extent, deburring micro parts does not always have to require hand manicuring parts with a scalpel under 10× to 20× magnification.
#micromachining
Share
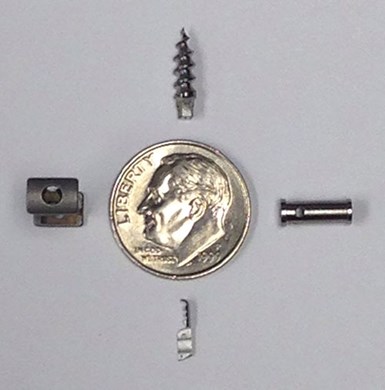
Small, machined parts come in many shapes and sizes. They all share burrs in common; the removal of which presents challenges to manufacturers.
One of the primary difficulties in deburring micro parts is the fact that the parts are small. Some level of magnification is required to see even the part features, let alone the burrs on the part. The first priority is to establish the deburring criteria and inspection method.
Discovering how the customer will be inspecting for burrs is a logical starting place. However, this is not always possible, and the criteria defaults to the predictable drawing note to “remove all burrs.” Use caution here—it has been said that given enough magnification, there are burrs on marbles.
Featured Content


Where’s the Burr?
For basic inspection techniques, magnification is a given. A stereo microscope with adjustable magnification from 7× to 50× is recommended. USB digital microscopes are another option. However, the depth of field and visual clarity of a stereo microscope are generally considered superior for the level of detail required. Inexpensive and versatile, USB scopes are an excellent solution for capturing images to use as visual aids for the inspection criteria.
In addition to visual inspection, attribute gaging with “go” and “no-go” gages is common practice for verifying the form, fit and function of micro parts. Given the small size of the features, magnification may be required to assist with the gaging operations. A 3- to 5-diopter lighted magnifying lamp should provide sufficient magnification and a 10- to 12-inch working distance, suitable for most shops.
OK, Now I See It
When it comes to the actual deburring, the first approach by many shops is to drop a “burr-free” part off the machine. “Burr free” is expressed in quotation marks here because if metal is being cut, there will always be a burr—it is the nature of metal cutting. Machines can be programmed for cutting tools and brushes to retrace the tool paths to minimize burrs, and hopefully the remaining burrs will be acceptable.
As is the case for many micro parts, the parts are found in precision assemblies in medical devices, electronics, fuses for the military, and various timing mechanisms, to name a few. The potential failure mode of an attached burr that affects the form, fit or function, or a burr that becomes loose and contaminates the system, resulting in a field failure, is a common denominator of these applications. For these applications, “hopefully” does not cut it when it comes to quality.
The potential to significantly add to the cycle time to re-cut the part in the attempt to remove the burrs is a final consideration of on-machine deburring. Adding cycle time impacts not only the cost per piece, but the throughput and efficiency of the work center. A shop may be dollars ahead to drop a part with the burrs, and deal with the burrs in a separate operation.
A Helping Hand
The next approach is the addition of a deburring operation in the routing. Hand deburring with magnification is a simple technique; however, simple does not necessarily equate to easy or efficient.
Again, the minute size of the parts makes basic part handling difficult. Typical tools used are surgical scalpels (or less expensive hobby/craft knives), razor
Remember that the higher the magnification used by the deburring operator, the faster fatigue will set in.
blades, dental tools, and brushes. The use of protective finger tape or guards is strongly encouraged.
Damage to parts, excessive material removal, losing or mixing parts, and missing a burr (the most common) are some of the potential pitfalls to consider relative to hand deburring. Remember that the higher the magnification used by the deburring operator, the faster fatigue will set in.
Ergonomic factors must be designed into the process/procedure. Hand deburring micro parts is a skilled process requiring proper training to achieve repeatable success. It is well worth the time to develop trained deburring operators to avoid these and other pitfalls if hand deburring is the best option for a particular part.
The cost of hand deburring, from the training to the actual cost per piece, can significantly add to the overall cost of a finished part. In addition, the time required to perform the operation can cut into lead times and shipping schedules. Fortunately, other options exist.
Unleash the Media
Mass finishing techniques using various types of media and various methods of excitation of the parts relative to the media can be used to remove some light external burrs on micro parts. The qualifications for light burrs and external burrs are again because of the part size. Given their small size, micro parts have very little mass and are too light for effectively removing large burrs.
Mass finishing will provide more of a polishing effect, which will remove light burrs, but merely polish larger burrs. The small size of the parts eliminates mass finishing as an option for internal burrs as the media is too large to reach internal intersections.
Media small enough to make it inside a part often does not come out. Separating micro parts from the media is another obstacle with mass finishing. Even with some of the potential issues, the low cost of mass finishing makes it an appealing process to try.
Turn Up the Heat
Thermal deburring has long been established as a traditional method for deburring precision machined parts. Thermal deburring, as the name implies, is a manufacturing process utilizing heat energy to remove burrs. The parts to be deburred must be thoroughly cleaned and/or degreased with all cutting fluid, oil and chips removed.
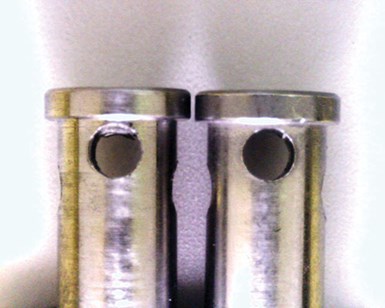
Check valves, with a burr (left) and without. These parts are deburred using thermal deburring.
The parts are placed inside a very thick-walled steel chamber, about the size of a large saucepan. The chamber is closed and sealed with a toggle clamp mechanism, exerting 250 tons of force. The sealed chamber is pressurized with a mixture of combustible gas, typically methane and oxygen, which is ignited with a spark plug device, creating a powerful explosion.
The explosion creates an intense heat approaching several thousand degrees Fahrenheit within fractions of a second. This intense heat energy will attack anything in the chamber with a high surface area to mass ratio, such as a burr.
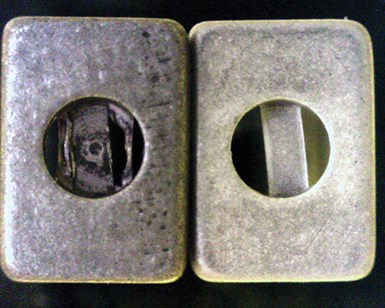
While mass finishing techniques work well in many applications, often they fall short of removing burrs on small parts. The example on the left was tumbled, yet still shows a burr in the bore. By using thermal deburring after mass finishing, the burr is gone (right).
Having a high surface area to mass ratio, the burr absorbs the heat from both sides. The heat cannot transfer from the burr to the parent material because the burr is very narrow at the root, and the burr is burned down to the parent material, resulting in the elusive burr-free edge.
The fact that deburring “media” is a gaseous mixture is a unique aspect of thermal deburring. The word “media” refers to the abrasives or implements previously mentioned. Being a gas under pressure, the thermal deburring “media” completely surrounds all burrs in the smallest and deepest holes, even if the burrs cannot be seen. This ensures that all burrs are removed to the same consistent degree on every part.
The blast of heat is accompanied by a shock wave. Most micro parts require fixturing to protect critical external surfaces and/or edges during processing. Fixturing is also used to heat sink very thin cross sections (high surface area to mass ratio) and/or to expose external burrs that may be heat sunk if the part were placed directly in the chamber.
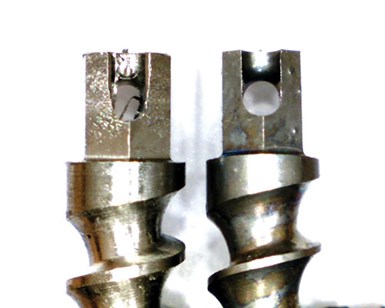
Because of the nature of the thermal deburring process, delicate features, such as the threads on these bone screws, are preserved.
Some micro parts, with internal burrs only, can occasionally be batch processed. The restriction of internal burrs only is made because any external burrs can contact an adjacent part, heat sinking the burr, causing insufficient deburring results.
Thermal deburring will not change any dimensions, surface finishes or material properties of the parent part when performed properly with suitable fixtures. The reason for this is that the parts are exposed to the intense heat for only a fraction of a second, with the actual part seldom reaching a temperature of only a few hundred degrees Fahrenheit. Threads are also not affected because they are wide at the root, allowing the heat to transfer to the part.
Where Did They Go?
As previously mentioned, the burrs are “burned” off the part. The word “burned” is not technically correct. Burning is merely common terminology for rapid oxidation, therefore, to be technically correct, the burrs are rapidly oxidized. Because the burrs are rapidly oxidized, an obvious byproduct of the process is that an oxide of the parent material is formed on the part. Thermal deburring of aluminum alloys generates aluminum oxide; thermal deburring steel alloys generate iron oxide, and so on.
These normal thermal deburring byproducts generally must be removed. For micro parts, the pre and post washing operations are complicated by the small size of the parts. Special baskets to hold the parts and prevent lost parts are required. If parts are subsequently plated, anodized or heat treated, the post process wash can usually be eliminated.
It Sounds Too Easy
Thermal deburring micro parts poses challenges as the parts themselves generally have a high surface area to mass ratio, because there is not much
The specific benefits of thermal deburring, as related to micro parts, address many of the shortfalls of other deburring methods.
mass to begin with. Proper fixturing to protect the part can be required. Without the fixture, the process sees the entire part as a burr, and the rest is history.
As with all aspects of manufacturing micro parts, handling can be a struggle. A magnified light ring aids the operator in loading parts into the thermal deburring fixture. As parts get smaller, tweezers or similar tools are used for loading and unloading purposes.
The specific benefits of thermal deburring, as related to micro parts, address many of the shortfalls of other deburring methods. These benefits include:
• Fixed manufacturing costs with no variances.
• Eliminating costly and time consuming hand deburring.
• Assurance that all burrs are consistently removed on every part.
• Reducing personnel and labor costs.
• Increasing quality levels and reliability.
What’s the Catch?
Thermal deburring is effective on almost all engineering materials, although as with any manufacturing operation, it is more suitable for some than others. As previously mentioned, the burr must absorb heat from both sides, reaching a high enough temperature to oxidize the burr.
These two very critical steps in thermal deburring, heat absorption by the burr and oxidation of the burr, become difficult to achieve if the material has a high heat transfer coefficient, as in copper. The burr absorbs the heat, but rapidly transfers it to the part.
A discussion on thermal deburring limitations would be incomplete without mentioning magnesium. All that can be said for this particular engineering material is that, regardless of the size of the burrs, all of the burrs will be gone.
Can’t We All Just Get Along?
Thermal deburring is not a one-size-fits-all solution for deburring micro parts. Thermal deburring can be used in conjunction with proper tool maintenance and clever routing to put the burr in the best location for removal, and thermal deburring can be preceded by a quick hand deburring operation to remove particularly large burrs that could exceed the capabilities of the process. The polishing effect of mass finishing on micro parts can be used post thermal deburr to provide a burr-free part that will shine in the eyes of the customer.
And Finally
Although deburring is typically the last step for manufacturing micro parts, do not make deburring the last consideration in job layout and planning. A little planning, work and different thinking up front will pay off in the end.
— Vectron, Inc.
RELATED CONTENT
-
Laser Technology "Turns" into a Turning Tool
This new technology uses a laser to act as a cutting tool to "turn" parts from solid barstock. This high-speed precision turning machine is especially useful for micromachining, enabling high accuracy for small, complex parts that are often delicate and difficult to machine when implementing conventional turning processes.
-
Keeping Watch on Small Parts
From watch parts to exotic medical applications, this shop takes on the world of micromachining.
-
Speed Matters in Microtooling Applications
A variety of tooling spindle options brings micromachining work within reach for shops looking to expand their capabilities.
